Sunday, May 31, 2009

#6 & #7 Week 3: Photos & Images


The photo has been made using Mosaic Maker and has lots of potential for bloggers' presentations.

On to the assignment of looking around at the things in that long list of Flickr mashups and 3rd party sights.

To my surprise I found many items that I could use for the little things I do on the web.

For the most part there are lots of things kids can use to do presentations for their school reports and creative endeavours.


Used properly and sparingly they can add to the presentation quality on blogs.

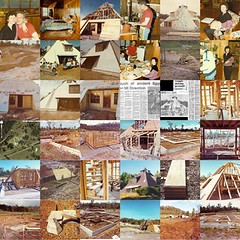
I'm quite impressed with the Montager, Mat and Mosaic Maker that offers a variety of means for presenting photos. I found it a great starting point for developing graphic aids.

The Montager is an interesting little gem. The one problem I found was that I've not been able to save the image. I'm writing the author to see if I can find out how to save a working image.

Before starting on the assignment I followed some advice I was given and looked up a number of blogs from the Blog Roll. I was a little disappointed to find many of them have not had entries for over a year.

However as I moved down the list I found some with current entries during this month in the Congratulations - 2.0 Team List.

I selected 7 of them and asked them to have a look at my blog and comment on it if they would.

I would suggest that a blog be set up for current registered SLL 2.0 participants to post the name and a link to their blog and a short introduction to themselves and their interests.

When I thought about this, the time of the year, with summer break about to start there may not be many people around unless they are be starting the School Library Learning 2.0

(SLL 2.0) to do some professional development. I'm looking forward to chatting with anyone that's doing the SLL 2.0 unit or not.

#7 Week 3: Photos & Images

Create a blog post about anything technology related:

I think I'll play the devils advocate here and throw the cat amongst the pigeons.

It's nearly 40 years since I started university and the educational technology has changed drastically. My Bachelors Degree was in Educational Media Production (1973) and Masters in Educational Media Technology (1974).

At that time all student teachers were required to take classes in Educational Media. The structure of the units of study encompassed Operation of AV equipment, development and preparation of graphic teaching materials, finding and using free and inexpensive materials, basic introduction to using the library and stratagems in using educational media to teach.

On a trip back to the US in 1997 I visited the university I graduated from to find that the Department of Educational Media was no more. I have no idea when the Media Department was axed as all the people I knew were no longer around. All of the units stated in the above paragraph were discontinued and personal computing had taken its place.

At the university I taught at, here in Australia, that change came about in 1985.

What that meant here was that student teachers were no longer taught the basics of development, preparation and stratagem of using media in the classroom. Did the same thing happen in the US?

Perhaps I'm on the wrong track here as I have lost contact with education since my retirement and the subsequent end of my Phd. Studies.

What I'm concerned with is that technology is pushing the basics of teaching to the side and leaves the new teacher without the necessary skills to be a productive teacher.

Don't get me wrong I'm a strong believer in using technology but without a firm foundation of basic concepts in the development and use of teachings aids, technology can be a poor substitute for good teachers.

In addition is the focus of extensive use of computer technology to teach at all levels of education to the detriment of the basics of reading writing and mathematics. Computers and calculators are wonderful aids to learning BUT! what happens when the power is cut off and the batteries go flat? I'll leave you with that question to ponder as I move on to another issue.

Word processing software:

This has to do with the use of free and inexpensive material. In this case free software.

I was introduced to the OpenOffice suite of tools which includes software that is compatible with Microsoft Office 2007. The price here when I bought it last year was AU$170.00

OpenOffice suite has Word Processing with a large number of dictionaries in many languages, Data Base, Spread Sheet, Presentation (computable with Power Point) and drawing applications.


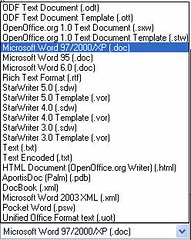
DropDown Menu showing the computable applications for the Word Processor. This is just a small example of the compatibility Of OpenOffice.

Comparing the user interface of OpenOffice with that of Microsoft Office is the simplicity. I have both and find there are even a few good things in Microsoft Office.

One very strong aspect of the OpenOffice is that you can convert PDF files back into Power point or text files to edit, change or recover graphics. I'm still discovering things I can do with OpenOffice. The best part of the whole thing is OpenOffice is FREE!!!

For More information about OpenOffice Click on the link below.

OpenOffice

I'm Looking forward to seeing more folks learning to blog.

George


Friday, May 29, 2009

#5 Week Three Photo Essay Part Three

The House that George and Mary Built

Building site viewed from the South. In the background you can see the Hill that is called Mount Direction. It's the Highest point between George town and Launceston.

During the early days of colonisation Mount Direction was where a semaphore station relayed messages to the port of Launceston the arrival of ships coming up the Tarmar River.

The buildings from left to right in are Workshop, caravan and storage shed. We lived in the caravan for the time we were constructing the house.

The road that borders the west of the property, (see Satellite photo from part two) when Tasmania was still a colony, (currently the Old Bangor Tram Road )was a narrow gauge tram track that was used to transport slate from the mine that was about 10 Km north of our building site. The line ran down to a jetty on the Tamar River where it was loaded on ships or barges to be split into shingles for roofs in Launceston Town.

The mine was abandoned around 1938 or so as most of the larger chunks of slate were depleted. There was one fella working the smaller bits and spitting for floor tiles etc. We did take advantage of the good price of the slate tiles and used them to tile out the bathroom floor and walls.

Having worked at the wood-chip mill left me with connections and I was able to have about 150 tones of spoiled wood-chips brought to the property to use as ground cover where the excavation work had been done on the site to keep the dust down.

The timber for construction of the house was harvested from a local forest and milled nearby. The mill was a little 2 man operation and I was able to get all the timber I needed from them. At the time the price of green cut timber was $22 per 100 super feet. A super foot is measured as a board 12 in. long 12 in. wide and 1 in. thick. 100 board feet equals 150 ft. of 4x2, 100 ft. of 6x2 etc. etc.

The framework for the house was made up of 4x2, 6x2 and 10x2 The floors were of 1x3 in. kiln dried hardwood seconds. The whole house was hardwood floors for under $700. I was able to get blackwood wall panels that were remodelling from a remoulding of a kitchen manufacturer sales room. That was used to panel out the bedroom and to make kitchen cabinets and benches. The remainder of the house was panelled in ½ x 8 in. planed air dried fence palings ½ x 6 or 8 in. used here to build fences.

In the process of building the house we did all we could to recycle whatever we could. I consider that as as a very green house.

The windows were all double glazed and the walls were insulated.

The temperature inside was 10 degrees C different than outside: cooler in the summer and warmer in the winter.

The links below will take you to a few more photos of the house and then it will end my little Photo Essay.

Mary and a friend of ours washing up after the meal. Behind Mary is the walk-in pantry. The sink Ray is wiping down I made from an old copper hot water cylinder.

That's me preparing a meal. The gas stove top was on casters under the work bench and was pulled out to cook On the right of the bench you can see the smokestack from the combustion stove. That stove had a hot water manifold in it and the feed to the electric hot water cylinder ran through it. That was a booster for preheating water when it was cold and used less power to heat.

Our dinning table built in and constructed from Tas oak. Note the post on the left was a wattle tree growing on the property. On the right is the stairwell to the bedroom.

Mary in the bedroom. The blackwood panels were recycled from a remodelling job to a kitchen manufacturing showroom.

Landscaping at the back (east side) of the house Using the woodchips.

Mary's oven out the back of the caravan. She baked in it for 3 years until she had the idea to use an electric fry pan as an oven. It worked very well.

Here we are sitting at the table hamming it up for the camera. Behind us you can see part of the Blackwood cupboards.

Mary with Baccus the cat sitting in a blackwood chair I built for the house furnishings. You can see the gas top put away under the work bench behind her.

Front entryway with the roof covering it.

entry way a view from the west. Used recycled fertiliser bags to cover cladding to keep out the rain until the shingles could be put on.

The Shingles are in place. They have been cut from Asbestos sheeting to cover about 400 sq m. ( didn't know then what we know about asbestos now). The flashing was made from 6 mm thick perspex from salvaged illuminated sign faces.

Construction of outer forms were designed to angle of the slope of the pyramid.

Tasmanian Oak cut for Fence Paling's was to construct forms. It was inexpensive and strong enough to hold the concrete with out bucking.

Outer corner forms set into place and used to check to see that the base was square.

Outer forms set in place West side. The outer footings were to support the roof beams.

Inner footings that were to carry the baring load of the house. They were put into -place after the outer footings were pored.

Viewing the forms from the north west corner. When laying out the level for the footings I did not have a theodolite, (a builders level)so I used the same method the Egyptians used. No quite in the exact way they did. Instead of flooding the site and draining the water away until they were at the desired hight and able to mark the level at the surface of the pond. I used a hose Wired to a stake at he highest level and filled it with water and adjusted hight of the lower point until I had the correct level for the surface of the footings.

There was approximately 25 Cu M of concrete in the footings. At the time we were building concrete was at around $100 a Cu M. That would have put the cost of concrete alone at about $2,500. Well, I bought a Cement mixer for $350 and the cement and aggregate for about $850 and did the job for about $1,100.

The north west corner ready to pore. Each corner was completely pored in one go. it took 2 of us about 7 hours to mix and pore so that we did not get a dry join of the concrete.

Look closely and you can see that the outer footings were designed with a notch built into them so when the inner footings were pored there was firm support to carry the bearing load of the house equally.

The footings completed and ready to start setting up the framework of the house.

Frame work in place, ready to rise into an upright position. The timber used in construction of the house was green cut Tasman Oak. By green I mean un-cured timber. Tasman Oak is the local species of hardwood from eucalyptus trees and only found in old growth forest in Tasmania. When this timber is cured you can not drive nails into it with out drilling a hole just under the size of the nail Or to use a nail gun. As I remember at the time there was no nail guns around so I did it the hard way.

A view of the south east conner of the house with frame work in place. Green timber is very heavy as it contains about 30% water so to raise the framework into place I used what's called a Jack pole. That was P pole about 4 m long with one end in a shallow hole so it cant move out from under the lode and fall over. A rope was tied to the top end of the pole and what's called a come along attached from the top of the pole to the frame work and pulled upright with a mechanical advantage.

When the ground level framework was up and the floor and celling joist in place The roof joist were added and the structure was locked into place and nothing could shake the framework.

With the framework up the stairwell to the next level went in.

As the ground level was open plan where I needed support for the celling/floor beams I used three logs cut from the property

Viewed from the south side shows the framing for the sun room.

From the west showing the front entry way.

View from inside to the sun room.
http://www.flickr.com/photos/38786513@N02/3567302305

Distant view of south west conner showing the second level frame work and roof cladding going up. The cladding was 20 mm thick hardwood.


Closer view of cladding from the north west corner.

All up the Land, house and all the tools needed to build it came in under $30,000.

I have babbled on long enough about the house. I hope you enjoyed my story and if you have any questions please feel free to send me an e-mail at:

reawaraent@yahoo.com


George

Thursday, May 28, 2009

#5 Week Three Photo Essay Part two


The House that George and Mary Built

Satellite View of Home site 2009.

The House sits On a triangular block of land 4.5 Hectares in Size. The Location is Mount Direction, Tasmania, Australia.


Shortly after I left the college I got a part-time job at a wood chip plant as a Weighbridge Attendant. Included in my job description I was First Aide, Storeman, Lab assistant, Printer and Courier driver. It turned out to be more like full-time as I was relief for the full time people who worked the jobs listed above.


I got to hate the job as it was shift work. In Australia they have what they call a rotating shift. The majority of business use the rotating shift and it is rare to find any that have a permanent shift system for their employees. You work 2 weeks day shaft then 2 weeks evening and then night shift. Just as you're getting used to the shift you have to change. I personally believe that is the cause for most injuries on the job. It didn't take me long to get feed up with that job.


One advantage of working there was when on the nightshift there was no traffic through the weighbridge and I had lots of time to work on the plans and model of the house while doing Fire watch and stand by incase of an accident in the plant.

It was Mary that came up with the idea to build a pyramid house. After giving it some thought it seemed like a good idea to me. I started researching pyramids to find out what the dimensions were and the layout of the base which was deemed to be critical to the “power of the pyramid.”

Mary took time off from work and went to Germany October- November 1980 with her mom. I stayed home and worked on the house plans as I had no real interest in going as I had been posted there for 3 years from 1966-1969 during the time I was in the army.

During the time Mary was gone our cat Snoopy came into the bedroom one night and had her kittens on the bed and I became the midwife for her litter.

By the time Mary returned from Germany I had the House plans finished and made the application to the George Town Council for a building permit. At the same time I submitted the house plans. I also had to include all the other buildings I had put up on moving onto the property. To my surprise approval came back in a fortnight. However it was only for the outbuildings and not for the house.

When I inquired why the approval for the house did not come with it I was told it was due to the fact that it was an an Frame and an Engineers report, was required before it could be approved.

Back to the drawing board... and I wrote up an engineers report explaining that number one it was not an A Frame house, but it was built like a wedding cake with the major weight of the structure resting on the inner footings.

See the following photos:


Wedding cake

Footings

Mary went back to work and I quit the job at the wood chip mill to work full time on the house.

My dream had finally come true and I had finally become a kept man.

I worked on the house from 1980-83 taking a few short-term jobs in the meantime to help with the cost of building materials.

We were living in the house by mid '82.

The following are two newspaper articles about the house:

Article One

Article Two

Read the articles by clicking on the links above they will take you to the photo.

Above the photo left top there is a link 'Download the large size'.
That will allow you to download the photo to your computer so that you can read it at 100% of the scanned image in your Windows Picture and Fax Viewer.

Sorry about the poor quality of the clipping they are 27 years old and I just scanned them. Also the number of photos of the house are limited in number as we have moved about five times since then and things some how manage to get lost in the shuffle. I will look for more of them to add to the flickr group.

It was now time for me to get back to work. Teaching jobs were few and far between about then so I decided it was time for a career change. After the experience of building the house I thought a career in Architecture would be exciting. I started a BA in Environmental Design In the School of Architecture at The Tasmanian State Institute of Technology (TSIT).

A little side note here: they were going to call it Tasmanian Institute of Technology but Someone saw the problem in the abbreviation of the name being (TIT).

End part two.

#5 Week 3 Photo Essay


Originally uploaded by reawaraent

House Viewed from the South West. It is to scale of the Great pyramid of Giza. The house has a Base of 11.5 M square and aliened to true North.

South West View of House

Photo Essay

The House that George and Mary Built

South West View of House

In 1979 we purchased a property and built this house to the scale of the Great pyramid of Giza. The house has a Base of 11.5 M square and aligned to true North.

I'm taking a step back here, to a time shortly before we were married. We met a retired Dutch couple that lived on some crown land North of Launceston in a village called Lefroy. It was an old gold mining settlement but had run dry and very few people lived there.

We were looking for some land to build on so the Schumacher's invited us to move onto the crown land with them rent free. We took them up on the idea and bought a second hand 16 foot caravan for $2,000. We lived in the caravan until we could find a place of our own.

During the time we were there I built a shed that could be easily taken apart when we moved and then reassembled on the new site. We stored what furniture we had in the shed in the meantime.

We were there for about six months until at last, the day came when we found our land and started to settle in.

We had to chuckle at people that came to visit us during this time. It was a bit primitive and many asked us how we could live like this.

It was being used as a paddock 4.5 hectares in size. It was a triangular shape block with a slope down to the road and a nice rich soil. We paid $16,000 Cash for the place.

We moved in and started by setting up the shed and getting things together.

Well it wasn't as bad as one might think. It didn't take me long to build a small building and set up a shower, laundry and toilet. I set up a platform that was about 8 foot tall and put a water tank on it. That gave us a nice head of water for showers.

And before you ask, we did not have to take cold showers I cobbled together a hot water heater out of a copper tank from an old burnt out hot water heater and an ancient combustion stove. Add to all that one of the small portable chemical toilets and we were in business.

Called up the power company to see about getting power on and they said I would have to pay $2,000 for a transformer to put on the power pole that ran through the property. I told them that they could keep their transformer and I would buy a generator. Interestingly they suddenly changed their minds and said I would have to pay a set amount for a year to justify them putting on the power even if we did not use it. In no time we had the power on and a builders box next to the caravan.

The caravan had a gas stove and a fridge but no oven to bake in. I went about gathering some stones that was around the property and managed to build a small wood fired oven. It worked out just fine Mary was able to bake bread and cakes in it. As a matter of fact the whole time we lived there we never had an oven. Mary came up with the idea of using a electric fry pan as an oven to bake in and it worked just fine.

Mary had been working as a clerk for a Shipping company but was laid off. We never did find out why but we think it was because she would not go out with her boss.

Anyway she managed to get a job with a company that sold Irrigation equipment and Concrete water tanks. That was to come in handy as she got an employees discount on anything they sold.

January 1980 rolled around and my contract with the college ended and we were established on the land so we did not have any rent to pay. The only “rent” we paid was $0.50 a week to the Council have the caravan on the property.

End Part one

Wednesday, May 27, 2009

#5 Week Three

Hello All.

It looks as if I have worked out most of the bugs and glitches I have had with my browser.

Things are starting to fall into place at last. I have the photos up loaded and I have decided to do a photo essay about the house my wife and I built in Tasmania.

I'll do it in small chunks and post them as I write them.

I have been experimenting with the blog publishing generator and found it very limited as you can't put additional html tags into the editor other then what it has been programed for. Thats to bad as ther are some nice html tags the can make the blog look very neat.

I'll move on now to start writing the essay. But before I do, here is some information on some FREE!! educational software:

Click here for Educational Software

And Here for FreeStuff

I have been using some of their software for over 10 years. Give it a try after all it is free and you cant beat that price!

George

Tuesday, May 26, 2009

More of Week 3: Photos & Images

Yesterday I was finely able to register my Blog with School library learning 2.0 after sorting out the problems with my browser. I'm using the new Internet Explorer version 8. As always Microsoft has made changes that takes time to come to terms with and the new security they have put into place has become so tight it block cookies you don't want blocked.

It seems that so far the major problem I have been having are with Yahoo and the sights related to them.

Makes me wonder if Microsoft is playing games to make it hard to get to Yahoo??? after all they do own Hotmail I think... its hard to keep up with who's buying whom out.

Well I'm slowly getting it sorted out.

Today I managed to get 23 photos uploaded to Flickr and wrote captions for them.

Started a group called Called Reawara Research For Research into Educational Internet Technology

Its goal is to promote the use of technology by educators to enhance their classroom activities.

When I got that all worked out I posted my Photostream to the group.

Click here to see group

The photos and captions are there. Its a Photo essay about the house my wife and I built in Tasmania.

Now I need to write the text of the story and link the photos to the story on the Blog. Will work on that tomorrow.

George

Week 3: Photos & Images

I went to Flickr And set up account and have started uploading photos and organising them for the assignment.

I find the setting up the account and uploading of graphics somewhat confusing to follow there are no clear step by step instructions that aide the novice in a smooth transition into becoming involved in using the media.

I have been working with the computerised media for over 25 years and find I have trouble following the instructions set out on most of the sites.

The instructions and steps have been written by people that know the procedures and don't think as a person new to the media thinks. The more I see the type of instruction for using this media I can see why librarians / teachers tend to shy away from using it.

The FAQ's are of some help but they don't really cover the subject in depth. When I run into a problem I spend a lot of time searching to find an answer to my problem. Many times I just have to go away for a day or two and think about it before I come back to solve it. Am I the only one that feels this way?

Answer this question do/did you find Instructions to setting up Flickr and Yahoo confusing?

Or is it just me or that I'm getting too old?

George

My First Post: Week 2: Blogging

Well I managed to get the Blog set up with out much of a problem. However when it came to getting the Avatar, that was a different story. Some glitch in the connection, so it said, ment I tried about 15 times to get a Yahoo account. Well I gave up on trying to use the PC to get the account so I went to the trusty old Mac and with in two tries I had it. Don't you just hate the new words or codes you have to strain your eyes to guess what the are to get you account to Yahoo etc?

Trying to follow the instructions on the 2.0 Web site by putting the background as a classroom or library. The thing was I went through all the backgrounds but found neither classroom or library. But my sharp mind said to me, “Hey there was a picture of the Sidney Opera House there, use that instead.” Well since I do live in Australia, I said to myself, “Self go ahead and use the Opera House background.”

Well as I always listen to my self I did just that. That done I tried to transfer the file to the Blog but Blog would not let me, kept sending me a error message saying , "I won't let you do it." "Aaa Haa, "said I, " I'll fix you!”, so I opened the file with my web browser and using a neat application Called HyperSnap DX Pro to capture the image, saved it as a jpg file. Did the thing with Blog again, and then this time Blog said, “That's ok you can do that.”

I have been using Hyper Snap since 1997 and found it very useful when Writing user manuals and other things that needed to capture images that you cant normally get from drop down menus.

The price is $35.00 US Check it out at:

HyperSnap

Hopefully this meets my first requirement for the 2.0 course.

George